
# How to Properly Perform a Wall Squat Wall squats (also known as a **wall sit**) are an excellent
There is an exercise that requires no equipment, takes up little space, and yet can transform leg strength, knee stability, and overall fitness. The wall sit – at first glance an inconspicuous exercise, often overlooked in favour of more complex strength training programmes – has been making a comeback in recent years among physiotherapists, coaches, and recreational athletes alike. And for good reason.
This exercise, known in English as a wall sit, involves pressing your back against a wall, sliding down into a position as if sitting on an imaginary chair, and holding that position. Yet behind this apparent simplicity lies a surprising depth – both technical and health-related. A poorly executed wall sit can strain the knees or lumbar spine, while a properly mastered technique delivers results appreciated by beginners and experienced athletes alike.
Try our natural products





Why the wall sit is so effective
To be clear about what we are actually discussing: during a wall sit, the quadriceps, hamstrings, gluteal muscles, and calves are all engaged in isometric contraction. Isometric contraction means that a muscle exerts force without changing its length – in other words, there is no movement at the joint, yet the muscle is still working intensely. This type of loading is particularly gentle on the joints, as it eliminates the dynamic impact that accompanies activities such as jumping or classic squats with heavy loads.
Research published in sports medicine journals has repeatedly confirmed that isometric exercises have a positive effect on reducing blood pressure, improving muscular endurance, and rehabilitating knee injuries. A 2022 review study in the British Journal of Sports Medicine even found that isometric exercise may be more effective at lowering blood pressure than aerobic activity. This makes the wall sit an exercise of interest not only to athletes, but also to middle-aged and older individuals looking for a safe way to maintain lower limb strength.
Another reason for the exercise's popularity is its accessibility. No gym, dumbbells, or mat are required. All you need is a solid wall and a little determination. This is precisely why the wall sit has become a popular component of rehabilitation programmes, home workouts, and warm-up routines before more demanding sporting performances.
How to perform the wall sit step by step
Before moving on to the specific execution, it is worth mentioning a real-life example. Jana, a forty-four-year-old accountant from Brno, started doing this exercise on the recommendation of a physiotherapist who was treating her for chronic knee pain caused by prolonged sitting at a computer. After six weeks of regular training – three times a week, three sets of thirty seconds – she noticed a significant improvement in knee stability and the disappearance of pain when climbing stairs. Her story is not exceptional. Physiotherapists routinely include the wall sit in programmes for people with knee osteoarthritis, following anterior cruciate ligament surgery, and for the prevention of sports injuries.
Let us now look at how to perform the exercise correctly so that it delivers similar results rather than unnecessary risks.
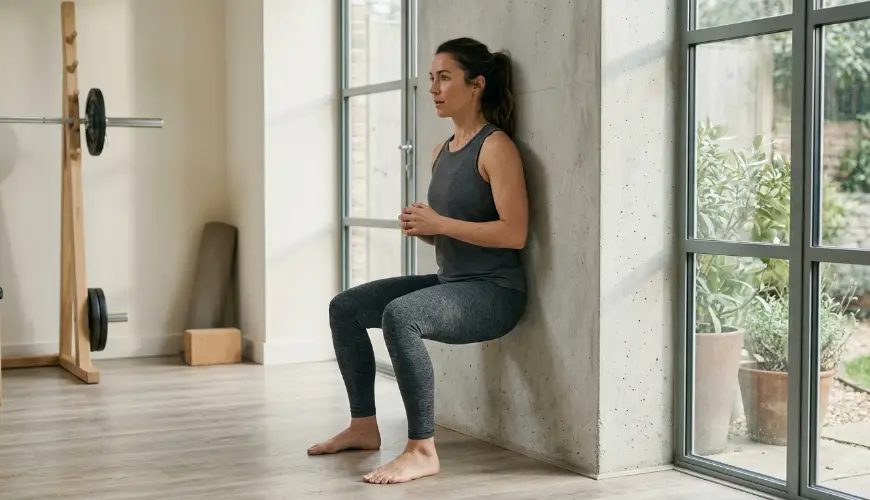
The starting position is crucial. Stand roughly half a metre to a metre away from the wall – the exact distance depends on the length of your legs – and press your entire back against its surface. Your back should be in natural contact with the wall from the hips to the shoulder blades, but it is not necessary to press every centimetre of your spine against it. A natural curve in the lumbar region is perfectly fine.
Place your feet hip-width apart or slightly wider, with your toes turned slightly outward – approximately ten to fifteen degrees. This position corresponds to the natural anatomy of the hip joint and makes it easier to engage the correct muscles. Keep your hands loosely at your sides, resting on your thighs, or crossed in front of your chest – whichever you prefer – but avoid resting your hands on your knees, as this reduces the effectiveness of the exercise.
Now comes the key moment – descending into the working position. Slowly begin to slide down the wall, as if you were about to sit on an invisible chair. Your knees bend and move in exactly the direction of your toes – neither inward nor too far outward. This detail is absolutely essential. Knees that collapse inward (known as valgus collapse) are one of the most common sources of pain and overloading in a poorly executed squat.
How far should you descend? The ideal position is one in which the thighs form an angle of approximately ninety degrees with the floor – meaning the thighs are parallel to the floor. This position maximally engages the quadriceps. However, for beginners or those with knee problems, a slightly higher position – around sixty degrees – may be more appropriate, as it is less demanding on the joint while still being highly effective. As physiotherapist and sports trainer Pavel Kolář puts it: "Correct technique is always more important than maximum range of motion."
Once you are in the working position, focus on ensuring that your knees do not extend beyond your toes. This rule is subject to debate – some experts allow for a slight overhang as natural – but for beginners, it is safer to adhere to it. Also make sure that your feet remain flat on the floor throughout; the heels must not lift.
Breathing during the hold is an aspect that is often overlooked. Breathe regularly and naturally, without sighing or holding your breath. Holding your breath increases intra-abdominal pressure and can be risky, particularly for people with high blood pressure. Calm, rhythmic breathing, on the other hand, helps maintain focus and extend the duration of the hold.
The duration of the hold depends on your current fitness level. Beginners can start with ten to twenty seconds, gradually extending to thirty, forty-five, and eventually sixty seconds or more. Three sets with a two-minute rest between them is the standard recommendation for strength training of this type.
After the hold, slowly slide back up to a standing position – again along the wall, rather than stepping forward abruptly. A sudden transition from isometric loading can cause dizziness or instability.
The most common mistakes and how to avoid them
Despite the apparent simplicity of the exercise, there are several mistakes made by a large proportion of those who perform it. The most common is placing the feet too close to the wall. If you stand too close, your knees will extend far beyond your toes as you descend, shifting the entire load onto the front of the knee. Conversely, standing too far from the wall will cause your back to peel away from it, undermining the very foundation of the exercise.
The second widespread mistake is actively pushing your back into the wall. Your back should rest naturally against the wall, not be pressed into it forcefully. Excessive pushing activates muscle groups other than the target ones and can cause tension in the cervical spine.
A third problem arises with people who try to extend the hold for as long as possible at the expense of correct form. Once the knees start collapsing inward, the feet begin to lift, or the back peels away from the wall, it is time to end the exercise. A shorter hold in the correct position is always more valuable than a longer hold with faulty technique.
There are also groups of people for whom it is advisable to consult a doctor or physiotherapist before starting this exercise. These include individuals with acute knee inflammation, those who have recently undergone hip or knee surgery, and those suffering from serious cardiovascular conditions. For everyone else, the wall sit is generally considered a safe and beneficial exercise.
If you wish to increase the difficulty over time, there are several natural progressions. One option is to place a small ball or cushion between the knees, which forces the inner thigh muscles to activate. Another possibility is to shift your weight onto one leg – the so-called single-leg wall sit – or to add light resistance in the form of dumbbells held in the hands. You can also combine the wall hold with slow arm movements, increasing the coordination demands of the exercise.
Regularly incorporating the wall sit into your daily routine – as part of a morning warm-up, a break from the computer, or as preparation before a run – can yield remarkable results within a few weeks. Stronger thighs mean better stability when walking, running, and performing everyday activities such as getting up from a chair or climbing stairs. And all of this without a single dumbbell, without a gym membership, and without any special equipment – just a wall, yourself, and a little patience.