
Home fermentation is simple when you know a few rules that always work.
In recent years, fermented foods have been quietly making a comeback into everyday kitchens. This isn't anything new or a social media trend – home fermentation is one of the oldest ways to preserve food, enhance its flavor, and often improve the digestibility of certain ingredients. And what's the best part? Once you understand the basic principle of "how to ferment," a world opens up where ordinary cabbage, cucumbers, or carrots transform into something that tastes more vibrant, juicy, and surprisingly complex in just a few days.
You might have already encountered the question of how to ferment at home without turning your kitchen into a laboratory. Good news: it doesn't have to be complicated. Fermentation is essentially a natural process where microorganisms (most commonly lactic acid bacteria) convert sugars into acids. This results in a typical tangy taste and an environment that is less hospitable to unwanted bacteria. When you create the right conditions, the process works for you – and you just occasionally check how it's doing.
Try our natural products


Why Ferment: Flavor, Tradition, and Benefits for Your Diet
Fermentation isn't just about food "spoiling in a controlled manner." In practice, it means that flavors become rounder, deeper, and acquire a pleasant acidity. Anyone who has ever compared a traditional cucumber with a quick pickle knows that the difference is not just in the acidity, but also in the aroma and crunch. This is one of the reasons why fermented foods are making a comeback: they are bold yet simple.
Aside from flavor, the benefits of fermented foods for everyday nutrition are often mentioned. Fermented products are often associated with supporting gut microbiome diversity because some contain live cultures (especially if they're not heat-treated). There are many credible sources and reviews on the microbiome topic – a good overview is offered by the Harvard T.H. Chan School of Public Health in their section on the microbiome, which discusses why the composition of gut microorganisms matters and how it relates to diet. It's fair to add that not every fermented food automatically means a "probiotic" (for example, baked sourdough bread typically doesn't contain live cultures anymore), but fermentation often brings other benefits – such as the production of organic acids, changes in fiber structure, or improved flavor saturation.
Fermentation also has a practical aspect: it's a way to reduce waste. Vegetable scraps that would otherwise wilt in a drawer can turn into a jar of crispy mix that lasts for weeks. And in times when sustainability is a hot topic, that's quite a strong argument.
"Fermentation is a way to give ingredients time to improve."
It sounds simple – and it really is simple if a few basic rules are followed.
How to Make Home Fermented Foods: Basic Principles Without Stress
When tackling how to make home fermented foods, most people face two concerns: "What if I mess it up?" and "How do I know it's safe?" It helps to understand that with vegetables, the most commonly used method is lactic fermentation (lacto-fermentation), which doesn't require any starter – just salt, the right container, and vegetables submerged in brine or their own juice. Salt helps draw out water, inhibits unwanted microorganisms, and simultaneously allows the "right" ones to multiply.
The most well-known method is fermentation in a salt brine (typically cucumbers, radishes, cauliflower) or "dry" fermentation, where vegetables are massaged with salt to release juice (typically cabbage for sauerkraut). In both cases, the key rule is: vegetables must be submerged. If they come to the surface and make contact with air, the risk of mold increases.
And now practically: what do you need when learning how to ferment at home?
- Jar or fermentation container with a wide mouth (clean, ideally sterilized).
- Salt – preferably without iodine and anti-caking agents (iodine can sometimes slow the process; it's not a disaster, but it's easier to use regular sea or rock salt).
- Water – if heavily chlorinated, boiling and cooling it helps, or using filtered water.
- Weight (like a smaller jar, clean fermentation stone, glass weight) to keep vegetables submerged.
- Patience: the first changes happen quickly, but the best taste often comes after a few days.
Typical salt concentration for brine is around 2% (that is, 20 g of salt per 1 liter of water). For cabbage, roughly 2% of salt by the weight of shredded vegetables is often used. It's not necessary to calculate to the tenth of a gram, but sticking to proven ratios pays off – fermentation tends to be more stable and the resulting flavor more balanced.
Temperature is also important. It ferments faster in warmth, slower in the cold. An ideal "home" range for starting is roughly 18–22 °C. If the room is a tropical 26 °C, fermentation will be more vigorous and the flavor might be sharper; if it's cold, the process slows down. In both cases, time can be adjusted.
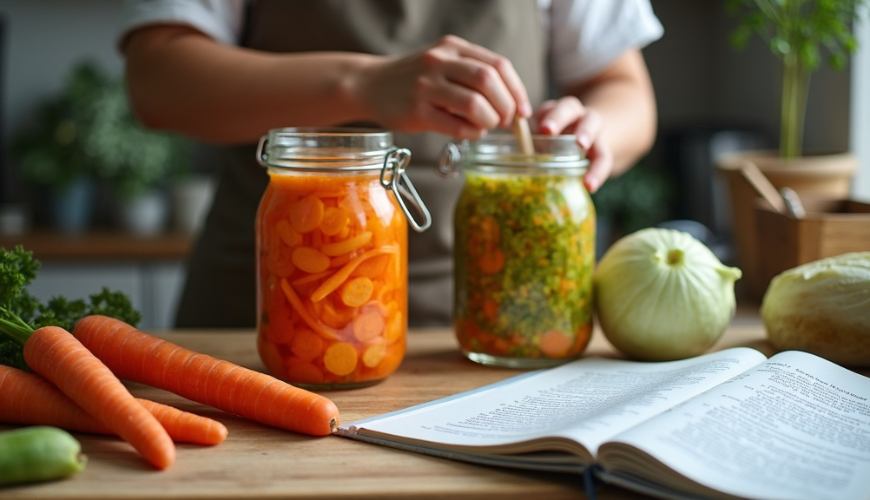
A Real Kitchen Example: The Jar That Changed Routine
In a typical household, there are often a few "staples" rotating in the fridge: mustard, ketchup, pickles. Then comes a week when more vegetables are bought with the good intention of "eating healthier," but reality is different – carrots soften, kohlrabi dries out, and half a lettuce ends up in the trash. This is where fermentation surprisingly helps. Just cut the leftovers: carrots into sticks, cauliflower into florets, a few cloves of garlic, a piece of ginger. Pour with 2% brine, weigh down, leave on the counter. In three days, it's a side dish that gets pulled out automatically for every dinner. Not because "it should be," but because it tastes good. And once this happens, the fermented jar starts appearing in the fridge regularly.
Tips and Tricks: How to Ferment Successfully (and When to Be Cautious)
Fermentation is forgiving, but there are a few moments worth not underestimating. The following tips and tricks for home fermentation aren't about perfectionism, but rather about peace of mind.
Let's start with what's normal. Bubbles? Great. Cloudy brine? Common. A smell that's strong and tangy? Correct. A white film on the surface (so-called kahm yeast)? Often harmless, though the taste may be a bit "flatter" – it can be gently removed and the process continued. What isn't normal is hairy mold in colors (green, black, blue) or a smell that resembles rot. In such cases, it's better to be strict and discard the jar.
A simple discipline helps a lot: clean tools, clean hands, jars without dish soap residue. While fermentation can "assert itself," there's no need to complicate it.
There's also a practical detail that determines success: weight and submersion. Air is the biggest enemy. If vegetable pieces keep floating to the surface, it's better to press them down with a cabbage leaf, an onion slice, or use a glass weight. In home conditions, this often means one thing: finding a system that works in that particular kitchen.
For those who want to speed up the process or soften the flavor, experimenting with spices is an option. Caraway, mustard seed, dill, bay leaf, chili, garlic, pepper all work. Just beware of too much garlic in a small volume – it can overpower everything else. And if experimenting with fruit or honey, it's good to note that more sugar means a livelier fermentation and more gas.
It's also worth noting that some foods ferment differently than vegetables. Dairy kefirs and yogurts require starter cultures, kombucha needs a "SCOBY," and sourdough is a chapter of its own. If the goal is to start right away without sourcing cultures, vegetables are the most accessible choice.
And one more practical tip: jars shouldn't be filled to the brim. Fermentation produces gas and the volume can rise. Leaving a few centimeters of space saves the hassle of wiping shelves.
Where to Use Fermented Foods So They Aren't Just "A Side Dish for the Brave"
A common question is where to use fermented foods so they're not just an occasional forkful of sauerkraut "because it's healthy." They work best when fermented flavors are treated as a seasoning or condiment – something that adds a spark to a dish, similar to lemon or quality vinegar.
Sauerkraut is not only suitable for traditional dishes but also in sandwiches, salads, or with roasted vegetables. Fermented cucumbers or carrots can be chopped into small pieces and mixed into spreads – suddenly even a simple lentil or chickpea spread becomes more lively. Kimchi behaves wonderfully with rice, noodles, but also in European cuisine: a spoonful of kimchi can awaken a creamy pumpkin or potato soup.
Fermented brine, which remains in the jar, is a chapter on its own. In small amounts, it can replace part of the vinegar in a dressing, add zing to a marinade, or flavor a legume salad. Just remember it's salty and acidic – so handle with care.
It's interesting how quickly fermented flavors become "normal." Initially, they might seem too bold, but then they naturally start appearing on plates more often – not because of a trend, but because they simplify cooking. When there's a jar of fermented vegetables in the fridge, even a simple dinner of baked potatoes and beans gains contrast and zest without complicated cooking.
How to Recognize the Right Moment and What to Do Next
One of the most pleasant things about fermentation is that it can be guided by taste. Some prefer vegetables to be only lightly tangy and still very crunchy – in that case, just a few days on the counter and then moving to the fridge, where the process slows significantly, will suffice. Others desire deeper acidity – they leave the jar longer at room temperature.
After opening or once the desired taste is reached, it's best to store fermented foods in the cold. In the fridge, they often last weeks to months, although the flavor will continue to evolve slowly. And if fermenting regularly, a practical reality soon becomes evident: it's better to make more smaller jars than one large one. They fit better in the fridge, and frequent opening disrupts stability less.
Fermentation sometimes poses as a world of the "initiated," but in reality, it's a return to something that used to be commonplace. It's enough to understand that salt and time are allies, and that the most important thing is to keep vegetables submerged. Then the question of "how to make home fermented foods" becomes more of a pleasant ritual: chop, salt, seal, wait – and look forward to when the jar quietly hisses upon opening, and the kitchen fills with an aroma that promises even an ordinary lunch will taste a little better today.

