# How to Clean Bathroom Grout Easily and Without Expensive Chemicals
Anyone who has ever stood in the bathroom and looked down at the floor or at the wall around the bathtub knows that moment. The grout between the tiles, once brilliantly white or at least neutrally gray, looks as though it has gone through a decade of neglect – even if you clean it regularly. Dark spots, yellowish coatings, perhaps even a hint of mold in places. And a question immediately pops into your head: can anything still be done about this, or is complete regrouting the only solution? The good news is that cleaning grout in the bathroom that already looks hopeless is, in most cases, entirely achievable – and you often don't even need expensive specialized chemicals to do it.
Try our natural products


Why bathroom grout loses its original appearance so easily
To understand how to get rid of dingy grout, it helps to know why it happens in the first place. Grout is, by its very nature, a porous material. At a microscopic level, it resembles a sponge – tiny pores absorb moisture, soap residue, minerals from hard water, and organic impurities. A bathroom, meanwhile, is an environment that combines practically everything a porous material hates: high humidity, heat, inadequate ventilation, and constant contact with water containing calcium and other minerals. The result is an ideal environment for the growth of mold and bacteria, which settle precisely in the grout.
According to experts at the Centers for Disease Control and Prevention (CDC), the key factor for mold growth is precisely the combination of moisture and organic material on which it can grow. Bathroom grout fits this description perfectly. Residues of shampoo, conditioner, soap, and skin oils create a thin film that serves as food for mold. And once mold has settled deeper into the pores of the grout, a simple wipe with a cloth simply isn't enough.
On top of that, there is another enemy – limescale. In areas with hard water, mineral deposits layer on the surface of the grout and create a yellowish or grayish-white coating that looks dirty even when there is no mold underneath. The combination of limescale and mold can then transform even a relatively new bathroom into a space that looks neglected.
Interestingly, many people clean their grout regularly but use unsuitable products or techniques. Aggressive chlorine-based cleaners do kill mold, but with frequent use, they can damage the structure of the grout and paradoxically make it even more susceptible to further contamination. It's a bit like a vicious circle – the harder you try, the worse it looks.
Take, for example, Jana from Brno, who after three years in her new apartment decided that the grout in her bathroom needed attention. "I tried everything I could find at the drugstore," she describes her experience. "Mold sprays, gel cleaners, even bleaching agents. The grout lightened for a while, but after a few weeks, it looked the same, if not worse." Her story is surprisingly typical. It wasn't until she changed her approach and reached for a combination of household products and a more thorough technique that she managed to get her grout to a state where it looked almost like new.
So what actually works? There are several proven methods that can be divided according to the degree of contamination. For lighter cases, where the grout is more grayish than black, ordinary baking soda mixed with water into a thick paste is surprisingly effective. Simply apply the paste to the grout, let it sit for at least fifteen to twenty minutes, and then scrub with an old toothbrush or a special grout brush. Baking soda is mildly abrasive, so it mechanically removes surface impurities, and at the same time has a slightly alkaline pH that helps dissolve greasy deposits.
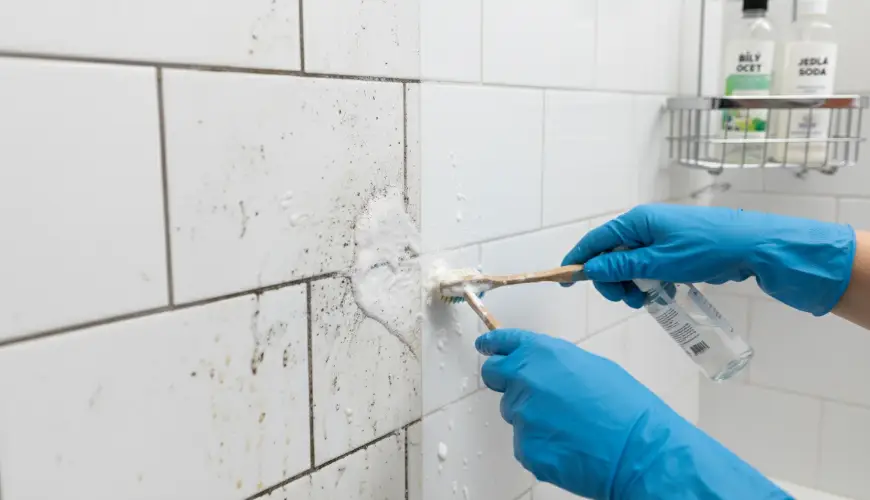
For moderately dirty grout, a combination of baking soda and white vinegar works well. The procedure is simple: first, apply a paste of baking soda to the grout, then spray vinegar over it from a spray bottle. The mixture will start fizzing – this is a chemical reaction between the alkaline soda and the acidic vinegar, which helps loosen impurities from the pores. After a few minutes of fizzing, scrub the grout again with a brush and rinse with clean water. This method is also recommended by experts in eco-friendly cleaning, as it requires no aggressive chemicals and yet is surprisingly effective.
However, when even baking soda and vinegar don't work and the grout is truly dark, moldy, or long-neglected, stronger products come into play. One of the most effective household solutions is a paste of baking soda and hydrogen peroxide (commonly available at pharmacies as a three-percent solution). Hydrogen peroxide has significant bleaching and disinfecting properties and, unlike chlorine, is gentler on grout material and the environment. Mix baking soda with hydrogen peroxide into a thick paste, apply it to the grout, let it work for thirty minutes to an hour, and then scrub thoroughly. For really stubborn stains, you can cover the paste with plastic wrap, which prevents it from drying out and extends the working time.
And what about cases where the mold is so deep that it has penetrated the very structure of the grout? Here, it's important to be honest – if the grout is not just dark on the surface but literally black all the way through, a more radical solution may be necessary. But that doesn't mean a complete bathroom renovation. There are special tools for scraping out old grout, whether manual or as attachments for multi-tools, that allow you to remove the top layer of grout and replace it with new. It's an afternoon's work, not a week's, and the result is usually dramatic.
How to prevent grout from getting dirty again
Cleaning grout is one thing; keeping it clean is another. And prevention is precisely the area where most people make mistakes – or rather, do nothing at all until the problem has grown back to unmissable proportions.
The basic rule is to reduce humidity in the bathroom to a minimum. This means thoroughly ventilating after every shower or bath – ideally with a combination of an open window and running ventilation. If the bathroom has no window, a quality fan with a timer is an investment that pays off not only for the grout but also for the overall longevity of the bathroom. As stated by the World Health Organization in its recommendations for indoor environmental quality, excessive humidity indoors is one of the main factors contributing to mold growth and related health problems.
Another effective preventive measure is a squeegee, which many people use on shower enclosures but few apply to tiled walls and floors as well. Yet wiping excess water from vertical surfaces after showering significantly shortens the time grout remains in contact with moisture. It's a habit that takes thirty seconds and can slow down grout contamination by months.
Grout sealing is also worth mentioning. There are special sealing products on the market that, once applied, create an invisible hydrophobic film on the surface of the grout. This film prevents moisture and impurities from penetrating the pores and significantly makes subsequent cleaning easier. Sealing is ideally done right after regrouting or after thorough cleaning and should be renewed approximately once a year. It's a step most people skip, yet it can be precisely the difference between grout that stays clean for months and grout that starts getting dirty within weeks.
Regular grout cleaning doesn't have to be time-consuming if done on an ongoing basis. Once a week during routine bathroom cleaning, simply go over the grout with a brush and a bit of baking soda or a mild cleaning product. This routine prevents the buildup of dirt and mold and eliminates the need for intensive cleaning, which is not only laborious but, as we've discussed, can even damage the grout when aggressive chemicals are used.
An interesting tip spreading among eco-friendly cleaning enthusiasts is the use of tea tree oil as mold prevention. Simply add a few drops to a spray bottle with water and occasionally spray the grout. Tea tree oil has natural antifungal and antibacterial properties and, unlike synthetic fungicides, is gentle on the environment. As American dermatologist and natural care advocate Dr. Andrew Weil noted: "Tea tree oil is one of the few natural antiseptics whose effectiveness has been repeatedly confirmed by scientific studies."
When it comes to choosing cleaning products, it pays to favor eco-friendly and biodegradable products that don't burden the environment and are also gentle on bathroom materials. Many conventional cleaners contain aggressive chemicals that work in the short term but can, over time, damage not only grout but also tile surfaces and fixtures. Switching to gentler alternatives is often not only more environmentally friendly but also more economical – baking soda, vinegar, and hydrogen peroxide together cost less than a single specialized spray from the drugstore.
Let's return for a moment to Jana from Brno. After thoroughly cleaning her grout with a paste of baking soda and hydrogen peroxide, sealing it, and establishing regular weekly maintenance, more than half a year has passed. The grout still looks clean and bright. "If I had known it was this simple, I wouldn't have spent two years buying expensive sprays," she says with a smile. Her experience confirms what home maintenance experts repeat over and over: the most effective solutions are often the simplest ones.
So if you're standing in your bathroom looking at grout that seems hopeless, know that it is almost never truly hopeless. All it takes is the right approach, a bit of patience, and a willingness to devote a few minutes a week to maintenance. Your bathroom will repay you – and you'll feel comfortable in it again, without that unpleasant feeling that something isn't right.

