
Fragrant sourdough bread — you can make it too
There is a special kind of frustration known only to those who have tried baking sourdough bread and, after the third failure, thrown their towel in the corner. The dough didn't rise, the crumb resembled a brick, the crust was the color of moon dust – and yet the entire apartment smelled of that wonderful aroma that promised something entirely different. If this sounds familiar, there's good news: the problem is almost never that a person lacks baking talent. The problem usually lies in a few specific, easily fixable things that classic recipes either don't mention or dismiss in a single sentence.
Baking sourdough bread has been experiencing a renaissance in recent years, not only among food bloggers but also in ordinary households. According to data from Google Trends, interest in homemade sourdough bread exploded during the pandemic in 2020 and has maintained a consistently high level ever since. People want to know what they're eating, they want to return to a slower way of preparing food, and they want that indescribable feeling of pulling a loaf with a crispy crust and a fragrant, airy crumb from the oven. But between desire and result stands the sourdough starter – a living organism that doesn't follow the clock but responds to temperature, humidity, and its own mood.
Try our natural products


Why It Doesn't Work on the First Try (and Why That's Okay)
Most people who gave up on sourdough bread baking made the same mistake: they approached it like a recipe for a bundt cake. Measure the ingredients, mix, put in the oven, done. But sourdough bread works differently. It's more like growing a plant – it requires observation, patience, and a willingness to adapt to conditions that change from day to day. Kitchen temperature, water hardness, the age of the flour, even the season – all of these affect the result. And that's precisely why the first, second, and even third attempt often turns out differently than expected.
The most common cause of failure is an insufficiently active starter. Many beginners start baking too early, when the starter doesn't yet have enough strength to leaven the dough. A healthy, active starter should double in volume within four to six hours after feeding at room temperature around 22–24 °C (72–75 °F). If it doesn't, it's not ready yet, and no recipe in the world will fix that. As Chad Robertson, founder of the legendary Tartine Bakery in San Francisco and author of one of the most respected books on sourdough baking, noted: "The starter will tell you when it's ready. You just need to learn to listen."
The second common problem is insufficient kneading or folding of the dough. Sourdough needs to develop a gluten network that traps the gases produced by the yeast. Without it, the dough will remain flat and dense, no matter how strong the starter is. And the third thing that trips up beginners is proofing – either too short or too long, where the dough over-proofs and loses its structure. All three problems have one thing in common, though: they can be solved once you understand what's actually happening inside the dough.
The basic principle is surprisingly simple. Sourdough starter is a mixture of wild yeasts and lactic acid bacteria that feed on the starches in flour. In the process, they produce carbon dioxide (which creates the bubbles in the crumb) and organic acids (which give the bread its characteristic flavor and also act as a natural preservative). The entire process is slower than with bread made using commercial yeast, but the result is incomparably more complex – in flavor, texture, and digestibility alike. Studies published in the journal Food Microbiology have repeatedly confirmed that the long fermentation in sourdough baking breaks down phytates and lectins, thereby improving mineral absorption and the overall digestibility of the bread.
When you know this, you start to see your previous failures differently. That flat loaf wasn't proof of incompetence. It was proof that the starter needed a few more days to gain strength. That dense crumb didn't mean the recipe doesn't work. It meant the dough needed more folding or longer proofing. And that unsightly crust? Perhaps the oven simply wasn't preheated enough or steam was missing during the first minutes of baking.
An Easy Recipe and Method for Good Homemade Sourdough Bread
Now for what everyone's been waiting for – the specific method that works even for those who have already given up three times. This recipe is intentionally simple and forgiving. It requires no special equipment beyond an oven, a bowl, and an ordinary pot with a lid (ideally cast iron, but stainless steel works too).
Ingredients: 375 g water (lukewarm, around 30 °C / 86 °F), 75 g active starter (fed 4–6 hours beforehand), 500 g bread flour (or a blend of 400 g white bread flour and 100 g whole wheat), 10 g salt.
The process begins by mixing the water and starter in a large bowl until the starter dissolves. Then the flour is added and everything is mixed by hand or with a wooden spoon until no dry flour remains. At this point, the dough looks clumsy and sticky – and that's exactly how it should be. This phase is called autolyse, and its purpose is to let the flour fully hydrate. Cover the dough with a towel and let it rest for 30 to 60 minutes.
After the autolyse, the salt is added and gently worked into the dough. Next comes the phase that is crucial for success: stretch and fold. Instead of traditional kneading, simply grab one edge of the dough in the bowl every 30 minutes, stretch it upward, and fold it over the center. Rotate the bowl a quarter turn and repeat. A total of four folds per round, four to six rounds over two to three hours. Between rounds, the dough simply rests covered in the bowl. Gradually it will change – from a sticky mass it will become smooth, elastic dough that holds its shape. This is where the gluten network essential for an airy crumb is built.
After the last fold comes the bulk fermentation at room temperature. The dough should increase in volume by roughly half – not double, just half. At a temperature around 22 °C (72 °F), this takes approximately two to four hours, but note: temperature is the key factor here. In summer it may be faster, in winter slower. That's why it's better to watch the dough, not the clock.
Then comes shaping. Gently turn the dough out onto a lightly floured surface and gently pull it into a round loaf using a bench scraper or simply your hands. The important thing is not to squeeze the air out of the dough while still creating surface tension – imagine wrapping a gift in wrapping paper, trying to keep the surface smooth and taut. Place the shaped loaf seam-side up into a proofing basket or a bowl lined with a heavily floured towel and put it in the refrigerator for 12 to 18 hours. This slow, cold proof is the home baker's secret weapon. Not only does it fit perfectly into a daily schedule (prepare in the evening, bake in the morning), but it dramatically improves the bread's flavor because the bacteria in the starter have time to develop complex aromas.
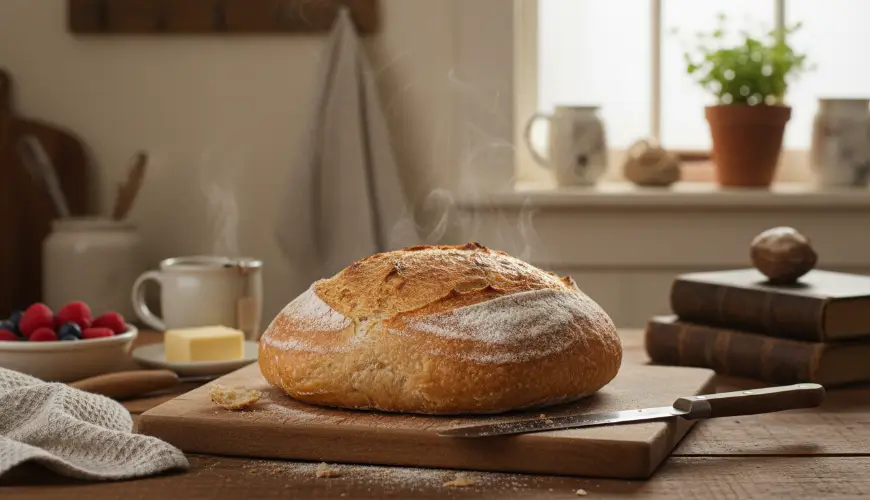
In the morning, preheat the oven to 250 °C (480 °F) with the pot inside – for at least 30 minutes so the pot is truly scorching hot. Turn the dough out of the proofing basket directly into the hot pot (carefully!), score it with a razor blade or sharp knife, and cover the pot with the lid. Bake for 30 minutes with the lid on (the steam inside the pot creates that beautiful crispy crust) and another 15–20 minutes without the lid so the bread turns golden. The temperature can be reduced to 230 °C (445 °F) after removing the lid. The finished bread should sound hollow when you tap the bottom – that's the sign it's fully baked.
And now the hardest part of the entire process: let the bread cool for at least an hour before slicing it. Inside, the baking process is still finishing and the crumb is stabilizing. Anyone who can't resist and slices the bread while hot risks a gummy, seemingly underbaked crumb – and another unnecessary disappointment.
The story of Markéta from Brno, who shared her experience in one of the Czech Facebook groups dedicated to sourdough baking, nicely illustrates how thin the line is between failure and success. After three attempts that ended in flat flatbreads, she wanted to pour the starter down the drain. Instead, on the advice of a more experienced friend, she fed it twice a day for another week and tried a fourth time – this time with an emphasis on making sure the starter had truly doubled in volume before using it. The result? A loaf with an open crumb, crispy crust, and an aroma that lured the entire family into the kitchen. As she wrote herself: "The only difference was that this time I waited until the starter told me it was ready."
It's precisely this moment – when a person stops blindly following a recipe and starts observing the dough – that is the turning point. From then on, sourdough bread baking becomes an intuitive affair. You can tell by sight and touch whether the dough needs one more fold. You can tell by smell whether the starter is at its peak of activity. And you can tell by sound whether the bread is fully baked.
For those who want to go even further, there's a whole world of experimentation – with different types of flour (rye, spelt, whole wheat), with additions of seeds, nuts, or dried fruit, with varying levels of dough hydration. But all of these are extras. The foundation is always the same: an active starter, enough time, and careful observation. Nothing more is truly needed for good homemade sourdough bread.
And if the first loaf after reading this guide still doesn't turn out the way it should? No worries. Slice it, toast it, spread it with butter – and it will still be better than most store-bought bread. And the next attempt will be one step closer to that dream result. Because that's how it goes with sourdough bread: the one who wants good bread doesn't give up. Only those who think good bread has to turn out perfectly on the first try give up.

