
Mistakes in Lard Rendering That Can Lead You to Trouble
Common Mistakes When Rendering Lard and How to Avoid Them
The aroma of slowly rendered lard wafting through the kitchen evokes memories of grandma's cooking, traditional Czech recipes, and homely comfort. Although rendering lard may seem like a simple process, a closer look reveals that it holds more complexities than one might think. Mistakes when rendering lard are more common than one might expect – and the result can be unpleasantly bitter, burnt, or even harmful to health. Let's explore where people most often go wrong and how to avoid these pitfalls to achieve fragrant, clean homemade lard suitable not only for spreading on bread but also for baking or frying.
Rushing as the Main Enemy - Too High Temperature
One of the most common mistakes people make when rendering lard is setting the temperature too high. In the belief that it will speed up the process, they turn the flame to full blast or set the induction to the highest level. The result? The fat quickly burns, starts to smell bitter, darkens, and instead of delicious lard, you get a greasy, burnt mass.
The ideal approach is to render slowly, patiently, on a low to medium flame, which can take over an hour, depending on the amount of lard. The temperature should ideally be between 90–120 °C. How to tell if it's too high? If the cracklings start to darken quickly and the fat splatters, it's time to reduce the heat.
Poor Quality or Improperly Cleaned Lard
Another common misstep is choosing poor quality lard. People often think that any piece of pork fat will do, but if the lard is spoiled, too marbled, or even smells, the result will never be tasty or long-lasting. The most suitable lard for rendering is the so-called leaf lard – fat from the pig's abdominal cavity, which is softer, lighter, and has a higher fat content.
It's also important to thoroughly clean the lard – remove any remnants of meat, skin, blood, or impurities. Even a small piece of meat can cause an unpleasant taste or shorten the shelf life of the final fat. Before cutting, it's good to slightly freeze the lard – it will be easier to cut into cubes and won't stick.
Rendering Without Water? Better Not
You may have heard that lard can be rendered "dry". Yes, it's possible – but with risks. If you start heating the lard without a drop of water, the fat begins to render unevenly, overheats, and burns more easily. That's why it's classic to add a small amount of water (e.g., 100 ml per 1 kg of lard) at the start of the process. The water evaporates during rendering but helps heat the lard gradually and evenly. It also reduces the risk of burning and improves the final color and taste.
Forgotten Stirring and Cracklings at the Bottom
Imagine you're rendering lard, everything looks fine, but over time you find stuck and burnt cracklings at the bottom of the pot. This is another common mistake – insufficient stirring. Once the lard starts to melt and the cracklings sink to the bottom, they need to be occasionally stirred with a wooden spoon or silicone spatula. Not only does this prevent burning, but it also evenly distributes the heat and supports better extraction of fat from the lard.
Using Inappropriate Cookware
At first glance a trivial detail, but even the choice of pot plays a role. The most suitable is cookware with a thick bottom, ideally enamel or stainless steel. Thin-walled pots or pans conduct heat unevenly and increase the risk of burning. If using an older enamel pot from grandma, check that the surface is not damaged – chipped enamel can give the lard a metallic taste.
Filtration? Don't Underestimate the Final Step
Once the lard is ready and the cracklings golden, the often overlooked step comes – filtering the fat. If you skip this step, small remnants of meat or skin will remain in the fat and spoil over time. You can use a fine sieve, gauze, or muslin cloth. Then pour the clean lard into jars, ideally sterilized, and seal. In the cold, it will last for several months, in the freezer even longer.
Overly Long Rendering and Dark Lard
Everyone wants beautifully golden, clean lard and crispy cracklings. But here too, less is sometimes more. If you try to "squeeze" the last drops of fat from the lard at all costs, you overextend the rendering process, and the fat starts to acquire a dark color and bitter taste. Watch the color of the cracklings – once they're golden and floating on the surface, it's time to stop. The fat should be transparent, slightly yellowish, not dark brown.
To Spice or Not?
Some people have the habit of adding onion or garlic during rendering for better taste. While it may be tempting, it's important to realize that such flavored lard has a limited shelf life and is suitable for consumption within a week. If you want long-term storable lard, it's better to flavor it during cooking.
How to Recognize Good Homemade Lard?
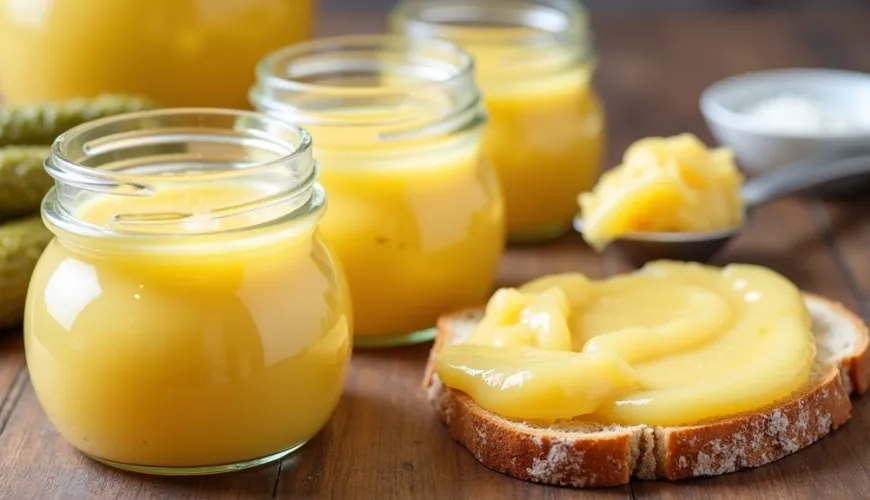
When everything goes well, the result is lard with a smooth buttery consistency, light yellow to white color, and neutral scent. Well-prepared lard is suitable not only for spreading on bread – ideally with homemade jam and a slice of cucumber – but also for frying, baking, or preparing traditional Czech dishes.
A Little Kitchen Story
For example, Mrs. Jana from Olomouc, who regularly sells homemade products at the farmer's market, once recounted: "Once I tried to fit rendering between two meetings. I turned the flame up a bit higher to speed it up. The lard was dark, smelled bad, and I had to throw it away. Since then, I render only in peace, with the radio on, and with a bit of patience."
In Conclusion - Slow Down and Pay Attention to Rendering
Rendering lard may be a somewhat forgotten ritual, but it has its place even in modern kitchens, especially if one values quality, homemade, and non-industrially processed ingredients. Although quick methods and modern technologies are tempting, in this case, the traditional slow approach is the best choice. Whether you use lard as a basic fat or as part of homemade pastries, its quality always reflects the care you invested during preparation.

